HOW SHOULD PREFORMED FLEXIBLE JOINT SEALANT BE INSTALLED?
There are two primary methods for installing preformed flexible joint sealant on box culvert joint surfaces, and the ideal methodology for each application depends heavily on the structure’s end use and the structure’s joint anatomy. Both methods are used to create a perimeter seal around the structure’s joint, however they employ different strategies to achieve it.
METHOD A: CONTINUOUS
Method A involves applying the joint sealant in a continuous application around the entire box culvert joint face. This method may require multiple rolls of sealant to travel the entire distance around the joint face, but the sealant is applied only to one joint face. See Figure #A. Method A provides greater reassurance of achieving a proper seal over the other method, Method B.
PROS: Continuous sealant application. Can knead ends of sealant together for homogeneity.
CONS: May have to suspend the sealant upside down in the bell using an adhesive like CS-1550.
USES: METHOD A MAY BE USED FOR ANY BOX CULVERT APPLICATION: SOIL-TIGHT, SILT-TIGHT, LEAK-RESISTANT, OR WATERTIGHT.
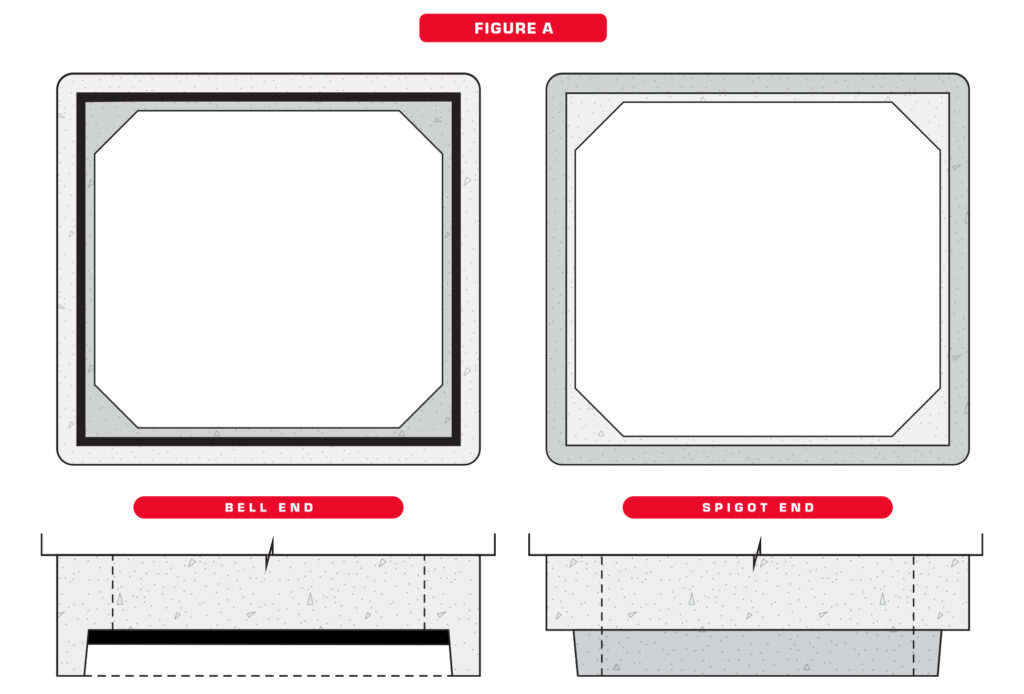
METHOD B: NON-CONTINUOUS
Method B involves applying the joint sealant in a non-continuous application on two adjoining box culvert joint faces. This method may also require multiple rolls of sealant, however with this method, the sealant is installed in a U-shape to one box culvert joint face (the bell end) and additional sealant is installed in an upside-down-U-shape to the adjoining box culvert joint face (the spigot end). When the two structure faces are joined together, the two portions of sealant come together to create a perimeter of sealant around the entire joint face. The positioning of the sealant on both structures must allow for 12” of sealant overlap at the structures’ mid-height on both sides. See Figure #B.
PROS: Do not have to suspend sealant upside down.
CONS: No certainty that the U-shape sealant on the bell and upside-down-U-shape sealant on the spigot will align. Unable to knead the sealant together to create a homogeneous rope of sealant.
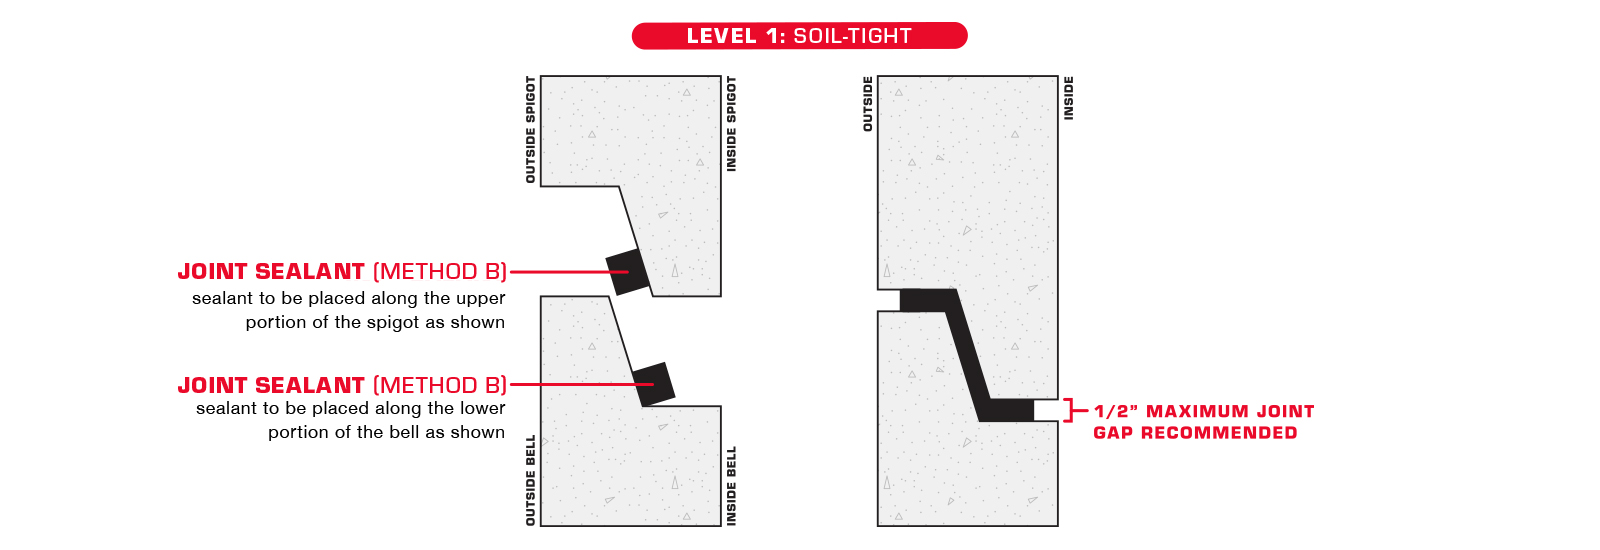
IMPORTANT NOTE: METHOD B MUST ONLY BE USED FOR SOIL-TIGHT OR SILT-TIGHT BOX CULVERT APPLICATIONS. IT SHALL NOT BE USED FOR LEAK-RESISTANT OR WATERTIGHT APPLICATIONS.

Different sealing solutions and ConSeal product combinations are needed for different box culvert applications.
The “Level 1: Soil-Tight” approach is the simplest sealing solution. Sealing solutions increase in robustness as the levels increase up to “Level 5: Watertight – Special.”
ALWAYS CONSULT WITH CONCRETE SEALANTS ENGINEERING BEFORE PROCEEDING WITH MATERIAL SELECTION OR PROCUREMENT.
LEVEL 1: SOIL-TIGHT
APPLICATIONS: Low-risk situations.
EXAMPLES: Stormwater conveyance.
ADVISORIES: Not for use with wastewater, hydrocarbons, chemicals, holding structures, contaminated soil, contaminated groundwater, deep bury structures, or where watertightness is required.
PRODUCTS:
CS-102 sealant installed using Method A or Method B. OPTIONAL ACCOMPANIMENT: CS-1550 adhesive.
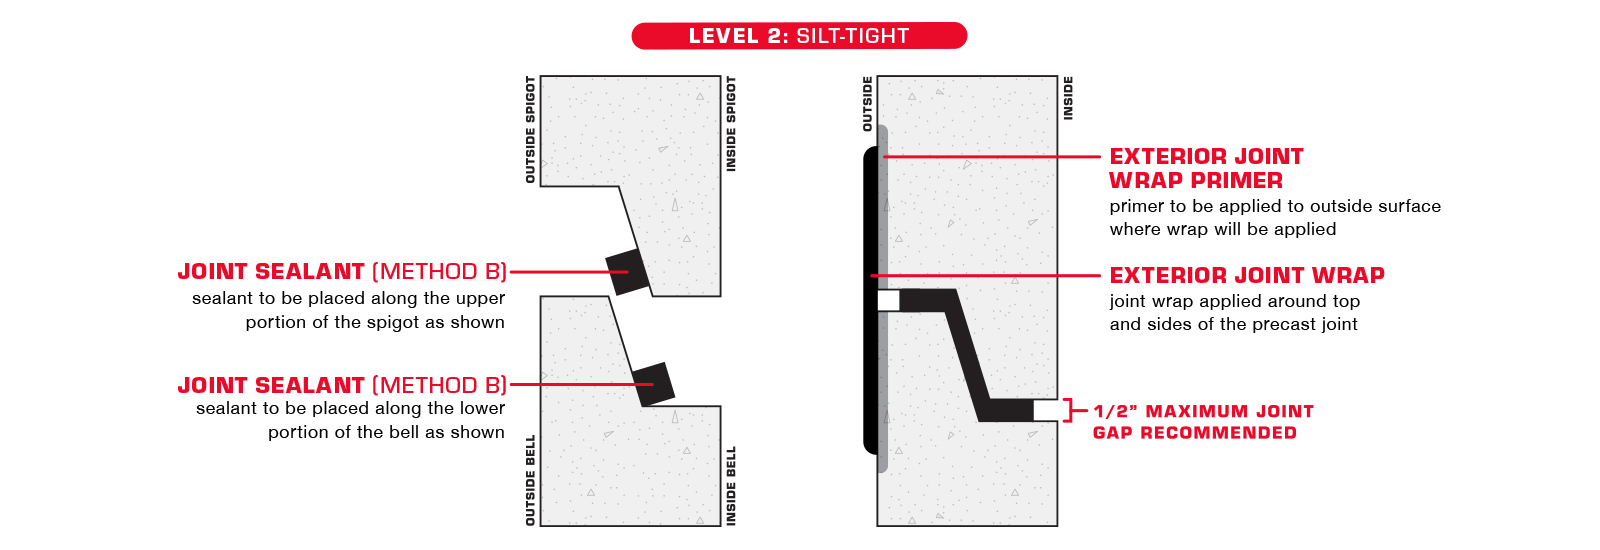
LEVEL 2: SILT-TIGHT
APPLICATIONS: Low-risk situations.
EXAMPLES: Stormwater conveyance.
ADVISORIES: Not for use with wastewater, hydrocarbons, chemicals, holding structures, contaminated soil, contaminated groundwater, deep bury structures, or where watertightness is required.
PRODUCTS:
CS-102 sealant installed using Method A or Method B. OPTIONAL ACCOMPANIMENT: CS-1550 adhesive.
CS-212 wrap. OPTIONAL ACCOMPANIMENT: CS-50/CS-75 or CS-80/CS-85 primer.
LEVEL 3: LEAK-RESISTANT
APPLICATIONS: Low-risk to medium-risk situations.
EXAMPLES: Stormwater conveyance.
ADVISORIES: Not for use with wastewater, hydrocarbons, chemicals, holding structures, contaminated soil, contaminated groundwater,deep bury structures, or where watertightness is required.
PRODUCTS:
CS-102. sealant installed using Method A only. REQUIRED ACCOMPANIMENT: CS-1550 adhesive.
CS-212 wrap. OPTIONAL ACCOMPANIMENT: CS-50/CS-75 or CS-80/CS-85 primer.
OPTIONAL SECOND ROW (LARGER STRUCTURES): CS-102 or CS-235 sealant installed using Method A only. REQUIRED ACCOMPANIMENT: CS-1550 adhesive.
OPTIONAL: CS-1500 elastomeric sealant (interior). REQUIRED ACCOMPANIMENT: CS-80/CS-85 primer.

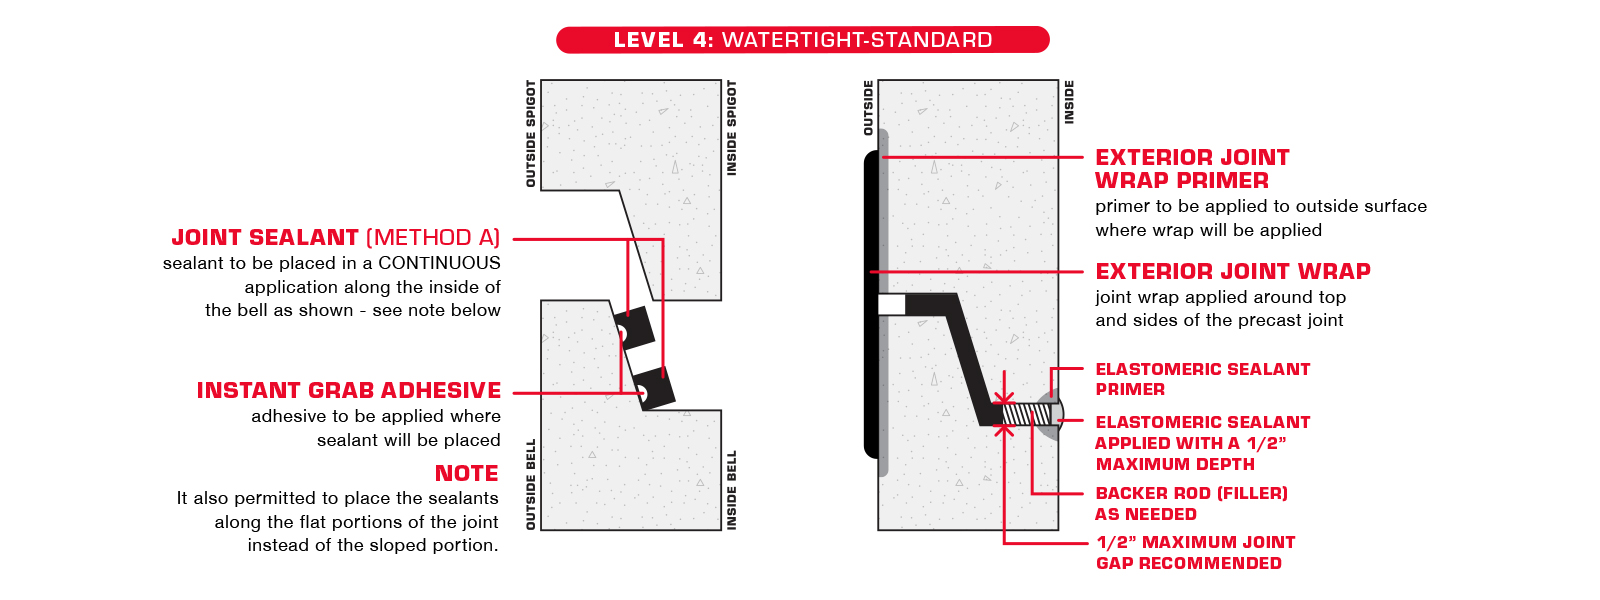
LEVEL 4: WATERTIGHT-STANDARD
APPLICATIONS: Medium-risk to high-risk situations.
EXAMPLES: Stormwater, wastewater.
ADVISORIES: Not for use with hydrocarbons, chemicals, contaminated soil, contaminated groundwater, or deep bury structures.
PRODUCTS:
CS-102 sealant – two rows, installed using Method A only. aREQUIRED ACCOMPANIMENT: CS-1550 adhesive.
ALTERNATE: CS-102 sealant (interior) and CS-235 waterstop sealant (exterior) installed using Method A only. REQUIRED ACCOMPANIMENT: CS-1550 adhesive.
CS-212 wrap. OPTIONAL ACCOMPANIMENT: CS-50/CS-75 or CS-80/CS-85 primer.
CS-1500 elastomeric sealant (interior). REQUIRED ACCOMPANIMENT: CS-80/CS-85 primer.
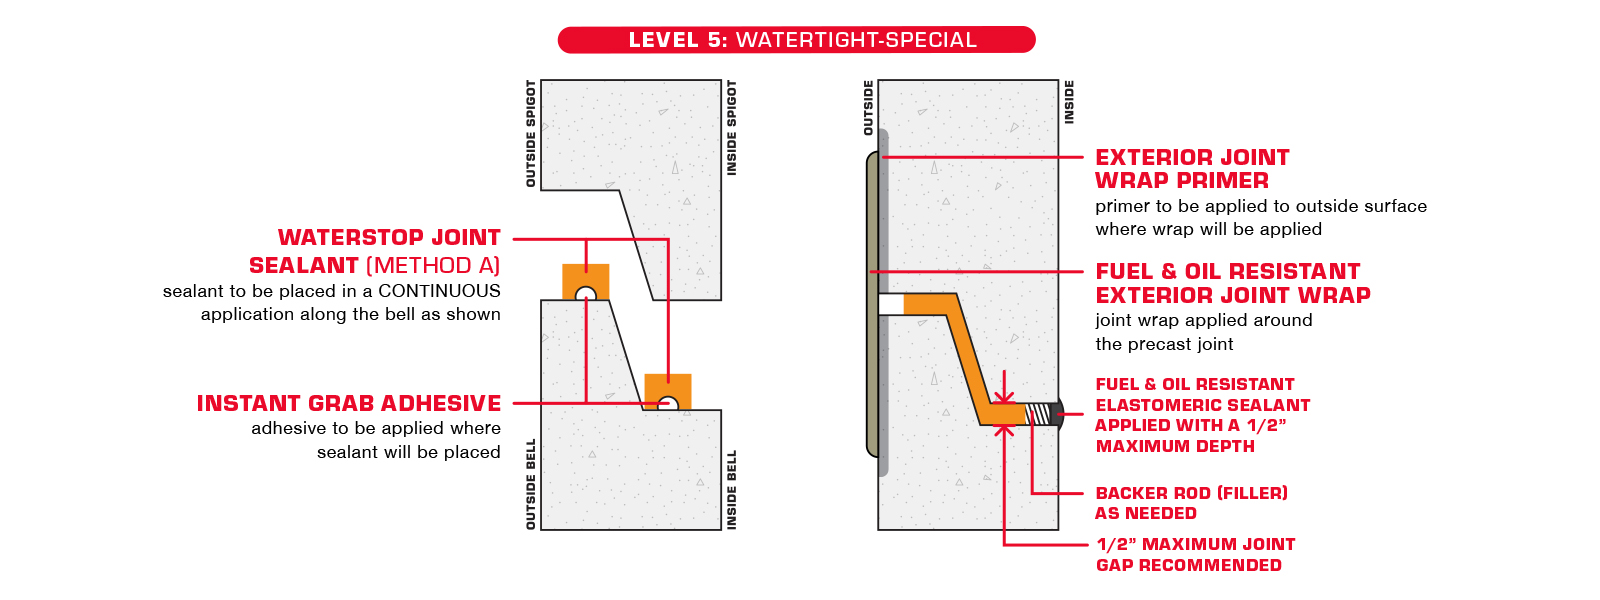
LEVEL 5: WATERTIGHT-SPECIAL
APPLICATIONS: High-risk situations.
EXAMPLES: Hydrocarbons, chemicals, contaminated soil, contaminated groundwater, or deep bury structures.
PRODUCTS:
CS-5000 waterstop sealant – two rows, installed using Method A only. REQUIRED ACCOMPANIMENT: CS-1550 bedding adhesive and CS-5000SA bonding adhesive.
CS-414 wrap. OPTIONAL ACCOMPANIMENT: CS-50/CS-75 or CS-80/CS-85 primer.
CS-1440 elastomeric sealant (interior). NOTE: Do not use a primer with CS-1440.
 t
t